
Measuring resistance

The ohmic resistance is measured by using a direct current or voltage. This is to avoid measurement errors due to the parasitic self-induction and capacity. In this way, not only resistors could be measured, but also the ohmic resistance of inductors, cables and the leakage resistance of capacitors can be measured.
Measuring with a multimeter
The most obvious way to measure the resistance is by using a multimeter set at the resistance range. In most cases this gives a reliable result. Only when measuring low ohmic resistances the fault becomes unacceptable due to the test lead and contact resistance. At high ohmic resistors the leak resistance plays a significant role. This will be discussed in detail in the following chapters.
The resistance measuring principle is clarified by the methods used in multimeters.
Passive multimeters

The most multimeter models provide with a moving coil meter measure the resistance as follows: The unknown resistor Rtest is placed in series with the range resistance Rb and the moving coil meter A and is connected to a voltage source Vs as shown in figure 2.
The current trough the meter is calculated as:
![]() [A]
[A]
This shows that the meter indication which is proportional with the current is non-linear. This explains the aberrant resistance scale that comes with these instruments. Rd in the equation is the moving coil meter resistance. The resistance Rm is the replacement resistance for the test leads and contact resistances. Because these resistances don't have a constant value, the uncertainty of low ohmic measurements is relative high.
Active multimeters

The voltage that is measured by the voltmeter V is:
When the test lead resistance Rm is ignored, the linear correlation between the resistance and measured voltage is clearly visible. The voltmeter must have a very high input resistance. Especially when high ohmic resistors are measured, this input resistance will play a significant role and make the result unreliable. Also here shall the test lead and contact resistance influence the accuracy, especially when measuring low ohmic resistors.
Four terminal sensing

As mentioned before the test lead and contact resistance may not be neglected when measuring low resistances. A value of 1 Ω for this extra introduced resistance in not uncommon. This can easily be tested by setting the multimeter in the lowest resistance range and holding the two test pins together.
If the resistance must be measured with an uncertainty smaller than 1%, than it's impossible to do this at resistances smaller than 100 Ω with an ordinary multimeter. Because the measure current of a multimeter flows through the test leads and contacts, it will cause extra voltage drops which are included in the measurement. A four terminal measurement eliminates these kind of faults by separating the current injection circuit and the voltage measurement circuit.
Using a current source

The resistor to be measured Rtest is connected to a current source Ib. By using a current source the test leads and contact resistance Rv don't influence the current through the resistor under test. The voltage across the unknown resistor is measured with a second circuit. Because this voltage is measured with a voltmeter V with a high input impedance, there will flow almost no current in this circuit. Therefore the voltage drop across the test leads and contacts resistances Rm is neglectable.
The unknown resistance can be calculated with ohms law:
![]() [Ω]
[Ω]
To improve the accuracy, the voltage must be measured as close as possible to the test object, and the current must be injected at a point away from the the test object as shown in figure 4 and 5.
Using a voltage source and resistor

If there is no power supply available who can be set to a current limit mode, also regulated voltage source with a current limiting resistor can be used. In such case the current limiting resistor Rs and a ammeter A must be connected in series with the voltage source Vs. The voltage setting and the resistor value must be adapted to the desired measure current. The exact current can be read from the amperemeter.
Benchtop multimeter and a Kelvin clip

More sophisticated multimeters like benchtop types can perform two terminal as well as four terminal resistance measurement. Therefore these multimeters are suited with a very accurate current source which is one of the terminal pair. The second terminal pair often called "sense" is connected to a high ohmic voltmeter. The measured voltage is internally converted to the resistance value.
To facilitate the four connections to the measured resistor so called kelvin clips are available like those in figure 7. A kelvin clip consists of two clips: one for the positive and one for the negative connections. Each clip has two lips who are isolated from each other. One lip is connected to the current source and the other to the voltmeter.
Wheatstone bridge
With a Wheatstone bridge an unknown resistance value is determinate by comparing it with a reference resistor.
Measurement arrangement
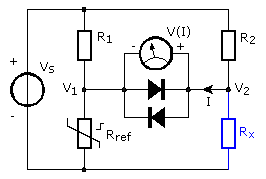
Due to the nature of a Wheatstone bridge there is no need for an accurate voltage source or measuring instrument. On the other hand, all the resistor values must be known exactly. The bridge is made out of two resistor dividers: On the left side the divider with the resistors R1 and the reference resistor Rref, and on the right side R2 and the unknown resistor Rx. The bridge is connected to a voltage source Vs. Originally a moving coil meter was used with the neutral position in the middle of the scale. In this way positive as well as negative deviations can be indicated. A modern digital multimeter can also indicate positive and negative values and is therefore also suitable.
The two diodes protect the instrument against to high voltages. These must be types with a low leakage current. In most cases a 1N4148 will do. But when high ohmic values are measured JFET diodes are preferable, ore use no diodes at all.
Measuring with a Wheatstone bridge
The resistors R1 and R2 must be exactly equal to each other. If the reference resistor Rref is chosen so that its value is the same as the unknown resistor Rx, than the current in both dividers are equal. The voltage across the resistors R1 and R2 will therefore also be the same, and as a result of this the voltage acoss the measuring instrument is zero and no current I flows.
If the indication of the instrument is positive, than the voltage on the right side is higher than the left side. The resistor value of Rx is therefore larger than the reference resistor. The opposite: if the instrument indicates a negative voltage, than the unknown resistor Rx is smaller than the reference resistor.
In practice a resistance decade box fills in the place of the reference resistor. Such a instrument has a great number of precision resistors which can be selected with rotary switches. The resistors R1 and R2 have a value with approximately the same magnitude as the reference resistor.
High ohmic resistors
Many multimeters have a range for very high resistance values, 200 MΩ or even higher. These ranges ar not always just as useful. The potential of measuring errors is due to the leak resistance that can occur between the terminals and to the earth. Make sure that the meter is dry, there is no dirt is present and that the test leads are from a good quality and are undamaged.
Measurement setup

Figure 9 shows the measurement arrangement for high ohmic resistors. To do a good measurement the resistor Ra must have approximately the same value as the unknown resistor Rx. The value of the supply voltage Vs must chosen so that the current limitation by Ra is equal to the measurement range of the meter.
The unknown resistor Rx can be calculated as:
![]() [Ω]
[Ω]
From this equation can be deduced that the resistor Ra must be well known to make te measurement accurate.
It is recommended to earth the negative supply voltage if very high voltages are being used. Keep all the high potential points clear from other objects to prevent corona discharges. And the used supply voltage must never exceed the breakdown voltage of the resistors.
Measurement faults
The most common measurement errors are already discussed in the previous chapters. There are some few other items that need attention.
Influence of the measurement on the resistance
The resistor value is aways more or less dependent of the temperature, given by the used material. Pay therefore attention to the temperature whereat the measurement is done. Because energy is dissipated in the resistors due to the voltage across and current that is flowing through them, the resistors will warm-up during the measurement. The values will therefore drift. Limit the power dissipation as far as possible and make the measure time as short as possible to increase the accuracy.
Skin-effect
All the described measurements are done with a direct voltage. The ohmic resistance is also frequency dependent. How this frequency dependent ohmic value can be measured is described in the article Measuring parasitic properties.